miro
Evaluation Kit for SX1272
P/N: DEV-FMLR-STEVK1
Quick Start Guide
This document provides a step-by-step guide on how to use this board with LoRaWAN®
2. Connecting
-
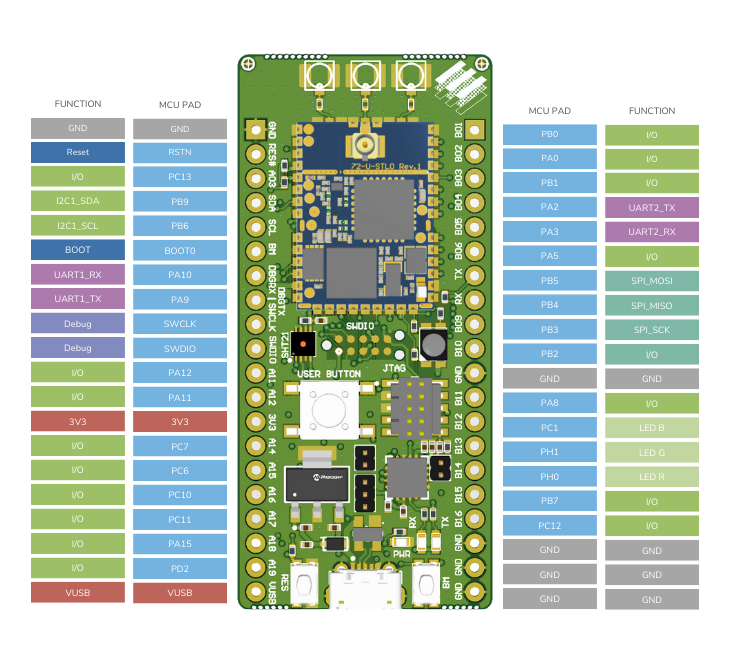
Development board with the USB cable to PC (Power and virtual COM port)
-
Antenna to development board
-
J-Link programmer debug probe to development board and PC
3. Developing
The development board comes with pre-loaded Firmware with the following features:
-
Blinking RGB LED at start-up
-
Reading sensor (temperature and humidity)
-
Joining over LoRaWAN
-
Periodic sensor read-out and transmit over LoRaWAN ® Follow the steps below to develop your own application :=)
5. Access the serial port of the EVK
In order to view the debugging output of the FMLR Module, you can use your preferred terminal application. (example: https://sourceforge.net/projects/y-a-terminal/)
Use the following setting:
| setting | value |
|---|---|
baud-rate |
2000000 |
data-bits |
8 |
parity |
even |
stop-bits |
1 |
flow control |
none |
You can now see the debug output of the pre-installed application. Now let’s develop your own LoRaWAN® application…
6. Working with WSL under Windows
Basic MAC is developed under Linux, but it runs similarly under Mac or under Windows with a Linux subsystem. In this paragraph, the use of WSL (Windows Subsystem for Linux is explained) is explained.
WSL does not have a graphical interface. To use your preferred IDE (e.g. Eclipse), make sure the source files of your project are located on a path supported by Windows. You cannot access files within WSL from windows (e.g., your WSL home directory is not accessible!). WSL is mounting your windows drive(s) in /mnt. Your windows user directory is therefore accessible from WSL at /mnt/c/Users/<yourwinuser>. To avoid line ending and other issues (such as case sensitive file names), it is recommended to do important git operations such as checkout and commits directly from within WSL. Working with windows based Git tools does work, but extra care is needed.
7. Install WSL
-
Follow Microsoft online documentation to install WSL (e.g. Ubuntu 20.04.1 LTS from Microsoft Store)
-
Open Power Shell as Administrator.
-
Run the following command:
Enable-WindowsOptionalFeature -Online -FeatureName Microsoft-Windows-Subsystem-Linux
8. Update Ubuntu for WSL
After installation update Ubuntu:
$ sudo apt-get update
$ sudo apt-get upgrade
$ sudo apt-get dist-upgrade
9. Git, Python, OpenOcd, GDB
Install the following tools in your Ubuntu WSL
$ sudo apt-get install git gitk make python3.8 python3-pip openocd gdb-multiarch
You might need to do a reboot of the system and continue here.
10. GCC-ARM
Do not use the gcc-arm provided by Ubuntu, use the PPA packet.
$ sudo add-apt-repository ppa:team-gcc-arm-embedded/ppa
$ sudo apt-get update
$ sudo apt-get upgrade
$ sudo apt-get install gcc-arm-embedded
Or, alternatively:
$ wget https://developer.arm.com/-/media/Files/downloads/gnu-rm/9-2020q2/gcc-arm-none-eabi-9-2020-q2-update-x86_64-linux.tar.bz2
$ sudo tar xjf gcc-arm-none-eabi-9-2020-q2-update-x86_64-linux.tar.bz2 -C /usr/share/
$ sudo ln -s /usr/share/gcc-arm-none-eabi-9-2020-q2-update/bin/arm-none-eabi-gcc /usr/bin/arm-none-eabi-gcc
$ sudo ln -s /usr/share/gcc-arm-none-eabi-9-2020-q2-update/bin/arm-none-eabi-g++ /usr/bin/arm-none-eabi-g++
$ sudo ln -s /usr/share/gcc-arm-none-eabi-9-2020-q2-update/bin/arm-none-eabi-gdb /usr/bin/arm-none-eabi-gdb
$ sudo ln -s /usr/share/gcc-arm-none-eabi-9-2020-q2-update/bin/arm-none-eabi-size /usr/bin/arm-none-eabi-size
$ sudo ln -s /usr/lib/x86_64-linux-gnu/libncurses.so.6 /usr/lib/x86_64-linux-gnu/libncurses.so.5
$ sudo ln -s /usr/lib/x86_64-linux-gnu/libtinfo.so.6 /usr/lib/x86_64-linux-gnu/libtinfo.so.5
$ sudo apt-get install gdb-multiarch binutils-arm-none-eabi
11. Install Python packages
Install the following python packages
$ pip3 install lz4 pycryptodome intelhex PyYAML
12. Getting the source code
Get Semtech’s LoRaWAN® implementation "Basic MAC". Get the latest example "ex-join" to show how to join a LoRaWAN® server at: https://gitlab.com/fmlr/fmlr-basicmac This is a fork of the official release from Semtech, but ported to Miromico FMLR modules. The official STM32 based release from Semtech can be found at https://github.com/lorabasics/basicmac More information about architecture and installation is at: https://lora-developers.semtech.com/ https://lora-developers.semtech.com/resources/tools/basic-mac/welcome-basic-mac/
13. Cloning the repository
$ git clone https://gitlab.com/fmlr/fmlr-basicmac/ex-join
$ cd ex-join
$ git submodule update --init --recursive
14. Building the projects
To build the Basic Loader, change to the basicloader directory and type make:
$ cd basicmac/basicloader/build/boards/FMLR-72-X-STL0/
$ make
To build the application, change to the application directory
$ cd application
Make sure the correct module is specified in the Makefile as shown below:
TARGET := fmlr_72_x_stl0
Build the project:
$ make
In the build-eu868 folder you can find the build-output and executables.
15. Downloading your code to the EVKit
To run your application on the module, you need to download the bootloader and the application. The bootloader only needs to be programmed once. After that it is sufficient to just reprogram the application.
16. Downloading using J-Link
This example uses J-Link (https://www.segger.com/downloads/jlink/) under Windows:
-
Connect the DevBoard to the Debugger Probe. Note you can leave the USB cable connected
-
Program the bootloader. This will fully erase the device and program the bootloader --- $ make jloadbl ---
-
Program the application --- $ make jload ---
Miromico also provides break-out boards to easily connect the J-Link programmer and the FTDI cable over TagConnect to your target.
17. Comissioning your Device
In LoRaWAN® a device needs to be identified:
-
DevEUI: The Devices Extended Unique Identifier
-
JoinEUI (Or AppKey): links the device to back-end-application
-
NwKey: security key known by the the device and the back-end to encode/decode the messages.
In BasicsMac this is hard coded in the persodata.c file.
void pd_init (void) {

    persodata_v1* ppd = pd_check_v1((void*) PERSODATA_BASE);
    if( ppd ) {
        pd = *ppd;
    } else {
        uint64_t eui;
        eui = 0x1aa72bf228286c1bULL;
        memcpy(pd.deveui, &eui, 8);
        eui = 0xC41BF8F9B18348DAULL;
        memcpy(pd.joineui, &eui, 8);
        uint8_t nwkkey[16] = {0xc3, 0x7f, 0xdd, 0xee, 0x5c, 0xce, 0x29, 0x88, 0xdf, 0x84, 0xea, 0xe3, 0x41, 0xd1, 0xbe, 0x4a};
        memcpy(pd.nwkkey, nwkkey, 16);
        memcpy(pd.appkey, nwkkey, 16);
    }
}
DevEUIs are provided by the Manufacturer.
18. Using a LoRaWAN® network
In order to receive the data from the dev-board over LoRaWAN ® you need:
-
A gateway (e.g. miroEdge)
-
LNS (LoRa Network Server): e.g. Loriot.io or TTI (The Things Industry)
-
Loriot: (https://www.loriot.io/)
-
-
Front-End or Dashboard.
More links:
-
LoRaWAN: (https://miromico.ch/lorawan)
-
MioTy: (https://miromico.ch/mioty-de)
